Build a Gmail Agent in 5 Minutes with Invoke

Managing OAuth, writing boilerplate, and wrestling with API quirks can turn a simple email agent into a days‑long project. With Invoke, you’re just a few lines of JSON and code away from a fully authenticated Gmail integration, no hidden hacks required.
Watch the full demo: YouTube Demo
Why Invoke?
- Zero boilerplate OAuth: No manual client creation in Google Cloud Console—Invoke handles it for you.
- Runtime discovery: Add or update integrations without restarting your agent.
- Human‑friendly JSON:
agents.jsonfiles are readable, versionable, and shareable.
Prerequisites
- Python 3.8+
- An OpenAI API key (or another compatible LLM)
pip install invoke-agent
Quickstart: Built‑In Gmail Integration
Invoke ships with first‑class support for Google APIs. To get started, simply:
from langchain_openai import ChatOpenAI
from invoke_agent.agent import InvokeAgent

llm = ChatOpenAI(model="gpt-4.1")
invoke = InvokeAgent(llm, agents=["google-calendar", "google-calendar"])

while True:
    user_input = input("📝 You: ").strip()
    if user_input.lower() in ["exit", "quit"]:
        break
    response = invoke.chat(user_input)
    print("\n🤖", response)
On first run, you’ll be prompted to authenticate via a link. Invoke stores tokens securely and refreshes them automatically, so you can focus on workflow.
Customizing with Your Own agents.json
Prefer full control? Download our Gmail agents.json template from the catalog. Edit the auth.code field:
"i"→ Invoke‑managed OAuth (default)nullor"o"→ Manual OAuth: you’ll supply client ID, secret, and scopes at runtime
{
  "agent": "google-gmail-send",
  "label": "📨 Gmail Send-Only API",
  "base_url": "https://www.googleapis.com",
  "auth": {
    "type": "oauth",
    "code": "o"
  },
  "endpoints": [
    {
      "name": "send_email",
      "label": "✉️ Send Email",
      "description": "Send an email via Gmail.",
      "method": "POST",
      "path": "/gmail/v1/users/me/messages/send",
      "body_params": {
        "raw": "The entire email content, base64‑encoded (RFC 2822 format)."
      },
      "notes": [
        "Construct 'to', 'subject', 'body' headers and body before encoding."
      ]
    }
  ]
}
Then point Invoke at your file:
from langchain_openai import ChatOpenAI
from invoke_agent.agent import InvokeAgent
llm = ChatOpenAI(model="gpt-4.1")
invoke = InvokeAgent(llm, agents=["/path/to/agents.json"])
# Or specify a URL where the agents.json file is hosted
# invoke = InvokeAgent(llm, agents=["https://example.com/agents.json"])
while True:
user_input = input("📝 You: ").strip()
if user_input.lower() in ["exit", "quit"]:
break
response = invoke.chat(user_input)
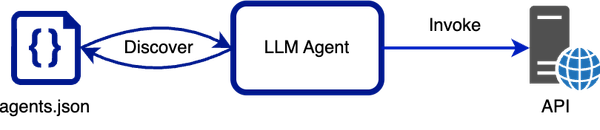
print("\n🤖", response)How It Works Under the Hood
- Discovery: Invoke reads your
agentslist at startup and creates tool definitions for the LLM. - Function Call: When the model issues a function call, Invoke maps it to the correct HTTP request.
- Auth Management: Tokens are obtained via OAuth flow or client‑secret input, then stored and refreshed.
- Execution & Parsing: Responses are returned to the agent, which parses JSON back into structured data.
This abstraction means your prompts stay concise, and you’re shielded from HTTP details and token lifecycles.
Next Steps
- 🎯 Explore more: Check out prebuilt JSON for Slack, Notion, and Google Calendar in our catalog.
- 📝 Contribute: Add your own
agents.jsonto the marketplace. - 🚀 Deploy: Integrate your agent into production workflows, chatbots, or automation pipelines.
Ready to build? Clone the repo and start coding: https://github.com/mercury0100/invoke
Happy automating!